DIY, Shasta Compact, Vintage Trailer, Vintage Trailer Restoration

Walking the Floor Over You

Of all the jobs that Elenore’s renovation required, I was the most excited to see new flooring. The original linoleum was about what you’d expect (gross), and somewhere along the line, the previous owners had applied a dark peel-and-stick tile that was trying really hard to come across as a reasonable improvement from its 1968 vomit-colored predecessor.

We knew we wanted to do a vinyl plank, for ease of installation and the fact that it’s virtually water-proof and easy to wipe clean. We went with this floating vinyl plank from Menards, which was a pretty good deal at under $40 a box; this project required about two full boxes.  I was really surprised at how quickly the process went – it took Joe most of the day to measure, cut and lay the flooring, but by about 4pm on Saturday, the only task that remained was to nail in the trim!

I was particularly proud of the solution Joe came up with for the the old heater grate. After we removed the gas heater, I thought the empty space would be perfect for a trash can, and planned to rig up a fabric curtain to hide it. But then we realized that it would be more useful and aesthetically appealing to somehow use the original grate, so Joe attached hinges and magnets to create a little drop-down door. I love that we could keep the original look of that spot, while still making it more useful in a modern sense (i.e., a spot to store a trash can instead of a deadly carbon-monoxide-emitting heater. Definitely a win).

It’s honestly just SO much fun to see everything coming together. I love how the green stove pops in contrast with the clean white and the pecan finish of the floors.

There’s only a handful of projects left, which is exciting, because our maiden voyage is scheduled for June 14! Joe and I are heading up to Perrot State Park (Luca will be with Nana & Bapa), to check out their kayak trail and of course get some delish supper club fare at Sullivan’s. I’m only mildly concerned that I swatted away my first mosquito on May 15th.


Standard
DIY, Shasta Compact, Uncategorized, Vintage Trailer, Vintage Trailer Restoration

Paint It Bl – er, White.

Elenore has been home for a few weeks now, with her brand-new frame parked right outside our house! She’s noticeably sturdier when we step inside, even without the stabilizers in place. Joe got sick of wrapping her up like a ginormous gift in the world’s largest tarp, so he ordered a rather nifty RV cover, complete with zippered door for easy access without cover removal. So far, it’s held up nicely to a few rain showers, a thunderstorm or two, and a couple inches of wet snow (ahhh, spring in Wisconsin).

I’ve been using the pronoun “we” a lot in these descriptions of Elenore work, but by “we” I mostly mean “Joe.” I’ve been chief designer and child-wrangler, which really suits our personalities best (Joe likes things done in very specific ways. I love the boy to bits, but he’s definitely an excessively careful worker, whereas I’m much sloppier. But it works for us, so whatevs).

The limited work time that we can get at the moment has been devoted to priming and painting the walls and cabinets. I’ve mentioned it before, but Shasta purists are aghast at folks who opt to cover the original paneling – which, in my opinion, works just fine with the earlier Compact models (pre-1965), because they had a beautiful, rich, amber-colored birch interior – a little fresh shellac would probably do the trick. But for some reason, the style of the later 60s was a lighter paneling, which I liken to a cross between a pale tan and a sallow grey. It’s just … icky. On a Mendards trip, we found Dutch Boy’s Split Banana, which I thought would bring a lot of light and space, without being too starkly white. I’m absolutely loving it.


The next (and super exciting) step will be flooring, which is a vinyl plank and corresponding shoe molding that Joe got on sale at Home Depot (you can see one plank laid out in the photos above). The previous owners covered up the original, hideous 1968 linoleum with an equally hideous peel-and-stick tile, so we’re hoping that the new flooring can just snap in on top of the current monstrosity. Given how drastically new floors can change a home aesthetic, I’m incredibly excited to see the difference a floor-facelift makes in the teeny space that is Elenore.

Standard
DIY, Natural, Resin jewelry

Heart of Glass (or, that time I became obsessed with resin jewelry).

When we moved into our home in Madison two years ago, we left behind an old Evansville farmhouse, that, despite its agricultural pedigree, was pretty bereft of attractive plant life. The first spring we lived there, way back in 2007, some errant yellow and white tulips appeared on the side of the goat barn-turned-garage, and I was ecstatic. Over the next ten years, we managed to plant some sad lilacs that never bloomed; a teeny, raised-bed vegetable garden that yielded not much more than overgrown cherry tomatoes and a few herbs; and a brilliant, deep-pink peony plant that first bloomed the same week Luca was born in 2014.

So we were surprised when our citified, 1979 two-story boasted gorgeous plant life: scarlet climbing roses; mature and fragrant lilac bushes; lush, drooping peonies; delicate bleeding hearts that reminded me of my Gram; charming, tall irises, and a large, white flowering crab tree that covered the front yard like a swath of bridal tulle.

This fall, I started noticing resin jewelry pieces on Etsy and Pinterest … I’m so captivated with the artists who use natural flowers/plants/other findings from nature in their baubles. I’m not exactly a green-thumb kinda gal, but I’ve always had an affinity for beautiful things; for traipsing around in the woods and picking random floral treasures (this goes waaaay back to my childhood, when my sister and I used to play in the woods adjacent to our house, and pick honeysuckle and the forbidden white petals of the state-protected trillium flower. Whoops).

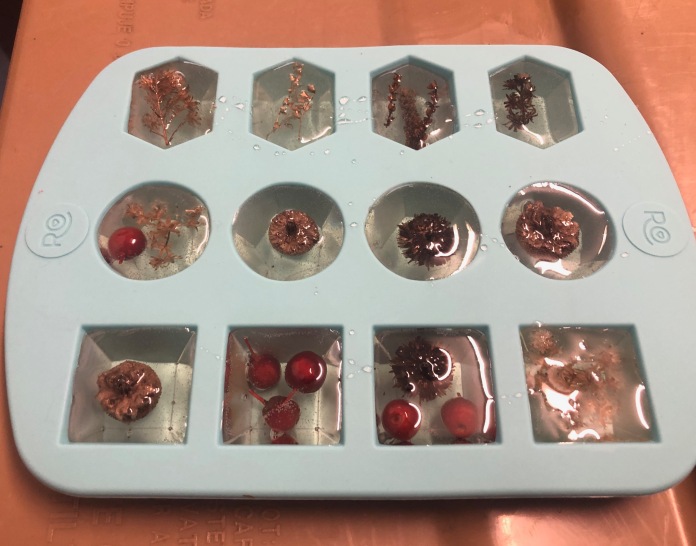
I picked up some polyester resin and catalyst at Michael’s, along with a cheap silicone candy mold; we’d taken Luca on a walk at Aldo Leopold Nature Center that weekend, and I had collected some dried winter plants and berries. Joe helped me mix up the resin and cast the molds – we discovered that polyester resin, while cheap, also happens to smell like absolute crap.

IMG-2604.JPG


I left it alone for a few days, and our garage still smells like a chemical plant. The result wasn’t exactly the resin pieces of my dreams, but it was definitely a successful experiment.

Looking forward to trying the process with epoxy resin, which is reportedly less lethal-smelling (albeit more expensive) and some much prettier molds/jewelry bezels. For now, these pieces are headed for sanding, and then some plan to make them into pendants or pins.

Standard